Raised bed gardening gives you more control over the parts of growing that usually cause trouble: poor soil, compacted ground, weeds, and awkward access. You can build a bed in a small backyard, beside a patio, or along a sunny fence. The work is manageable, too, especially when you plan the bed before buying lumber or hauling soil.
Look, the first bed doesn’t need to be perfect. It needs enough sun, decent drainage, healthy soil, and plants you actually want to eat. Here’s how to make those pieces fit together.
Choose the right spot before building
Start with sunlight. Most vegetables produce best with at least six hours of direct sunlight each day, and fruiting crops such as tomatoes, peppers, cucumbers, and squash often prefer eight or more. Watch the proposed area from morning to late afternoon for a day or two. A spot that looks sunny at 10 a.m. may sit in shade by lunch.
Keep the bed close enough to your house that watering won’t become a chore. A bed at the far end of the yard tends to get forgotten in July. We recommend choosing a location near a water source, with enough room to walk around every side. Good access matters more than a perfectly neat layout.
Stay away from low spots where rain collects. Raised beds drain better than in-ground gardens, but they still need somewhere for excess water to go. Avoid placing one directly beneath a large tree, too. Tree roots compete for moisture, and the canopy can cut down sunlight. Falling leaves aren’t a disaster, though. They can become useful organic matter later.
How large should a raised bed be?
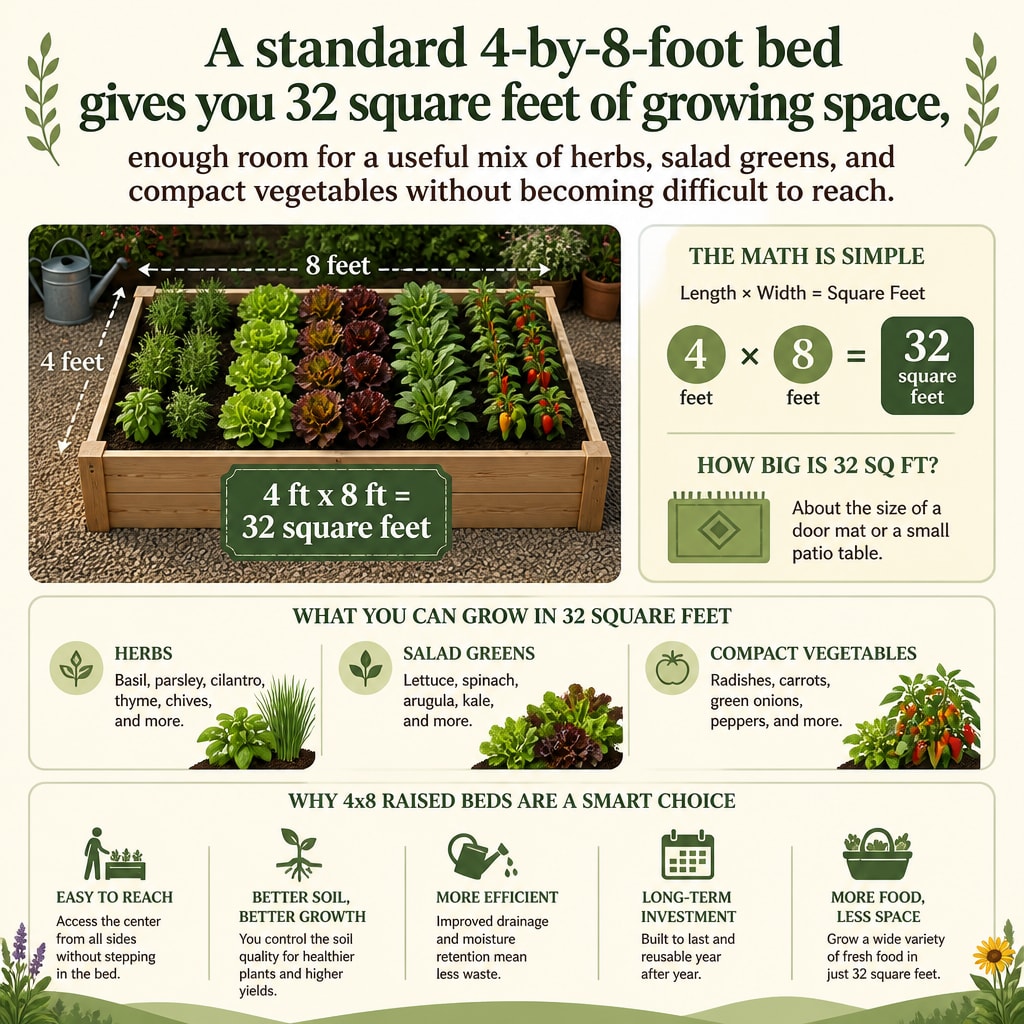
For beginners, a four-foot-wide bed is a comfortable limit. You can reach roughly two feet from either side without stepping into the soil. Length is more flexible. Four, six, and eight feet are common choices.
A standard 4-by-8-foot bed gives you 32 square feet of growing space, enough room for a useful mix of herbs, salad greens, and compact vegetables without becoming difficult to reach.
Older gardeners and anyone with limited mobility may prefer a narrower bed or a taller design. A 24-inch-high bed reduces bending, though it uses more soil and needs stronger construction. There’s no prize for making a bed enormous. Smaller beds are easier to weed, water, and cover when a cold night threatens.
Pick materials that will last
Untreated cedar is a popular choice because it resists decay and is safe around edible crops. Other untreated rot-resistant woods can work as well. Pine costs less at first, but it usually breaks down sooner, especially where the boards stay damp.
Be cautious with salvaged lumber. Old boards may contain paint, chemical treatments, or residues you don’t want around food. Avoid railroad ties and mystery wood. They may look sturdy, but creosote and other preservatives aren’t appropriate for a vegetable bed.
Use exterior-rated screws rather than nails when assembling the frame. Screws make repairs easier, and they hold boards together as the wood swells and shrinks. For beds taller than about 12 inches, add corner posts or internal braces. Soil is heavy. A long wall can bow outward surprisingly fast.
What about treated lumber?
Modern residential treated lumber is generally made with preservatives different from the old arsenic-based formulas that caused concern. Still, gardeners who want a simple choice often stick with cedar, untreated wood, stone, concrete blocks, or metal designed for garden use.
Line the inside of a wooden bed only when you have a clear reason, such as separating soil from contaminated ground. Plastic sheeting can hold moisture against the boards and shorten their life. Don’t cover the bottom with landscape fabric unless you’re dealing with a specific weed or root problem. Soil organisms and plant roots benefit from contact with the ground.
Build the frame and prepare the ground
Clear grass and weeds from the footprint. You can remove the sod, cover the area with overlapping cardboard, or use a garden fork to loosen the soil beneath the bed. Cardboard works well for smothering turf, but remove glossy labels and tape first. It will soften over time as the soil stays damp.
Set the frame in place and check it with a level. A slightly uneven bed isn’t a crisis, but a strong slope can cause water to collect at one end. Shim the low side with soil or adjust the ground before filling. This small step saves frustration later.
Don’t build a sealed box unless you need one. An open-bottom bed lets worms move in and allows excess water to drain. On pavement, use a bottom made from durable boards or a container designed for growing. Those beds need closer attention to watering because they dry out faster.
Fill the bed with healthy soil
Soil is where many new gardeners overspend or cut corners. Garden soil dug from the yard is often too dense by itself, especially in a raised container. Potting mix is lighter but usually too expensive for a large bed. A blended raised-bed mix is the practical middle ground.
A useful mix contains topsoil, finished compost, and a material that improves drainage or air space, such as aged bark fines. The exact ratio depends on the ingredients. A common starting point is about 60 percent topsoil, 30 percent compost, and 10 percent aeration material. Mix thoroughly rather than creating layers. Distinct layers can slow drainage and restrict roots.
Most vegetables need roughly 6 to 12 inches of usable soil, while deep-rooted crops such as carrots and parsnips may need 12 to 18 inches for straight, full roots.
Buy soil from a supplier that can explain where it came from and whether it has been screened or tested. Avoid fill dirt from an unknown excavation site. It may contain weed seeds, rubble, or contaminants. For a small bed, bagged soil is convenient. For several beds, delivered soil is usually less exhausting and more consistent.
How much soil will you need?
Calculate volume before ordering. Multiply length by width by soil depth, then divide by 27 to convert cubic feet to cubic yards. A 4-by-8-foot bed filled 12 inches deep needs 32 cubic feet, or about 1.2 cubic yards of material. Order a little extra for settling.
Don’t fill the frame right to the rim. Leave 1 to 2 inches at the top so water and mulch don’t wash over the sides. Fresh soil settles during the first few weeks. Top it up with compost or extra mix rather than disturbing the roots of newly planted crops.
Plan plants around your space and season
Draw a rough map before planting. Put tall crops on the north side of the bed so they don’t shade shorter plants. Trellises for peas, cucumbers, and small vining squash can sit along a back edge. Tomatoes need room and airflow, so don’t squeeze several plants into one corner because the seedlings looked tiny in spring.
Choose vegetables your household will use. A few productive plants can supply more food than a bed packed with crops nobody wants. Leaf lettuce, radishes, bush beans, carrots, basil, chard, and compact peppers are friendly starting points. Tomatoes are popular, but they need steady support and regular watering.
Read the seed packet for spacing and days to maturity. Ignore the temptation to plant everything at once. A second sowing of lettuce or beans a few weeks after the first can keep harvests coming instead of producing one giant pile.
Use succession planting
Succession planting means replacing a finished crop with another one. Early peas can give way to beans. Spring radishes can make room for summer herbs. This works especially well in a raised bed because the soil warms earlier and stays easy to work.
Many leafy greens mature in about 30 to 60 days, making them practical candidates for two or more plantings during a single cool growing season.
Keep a simple garden note with planting dates, varieties, and what struggled. Your own notes become more useful than a generic chart after one or two seasons. You’ll know which corner dries quickly, where rabbits get in, and which tomato variety handled your weather.
Plant without overcrowding
Spacing is not wasted space. It gives leaves room to dry, roots room to grow, and you room to harvest. Crowded plants compete for water and nutrients, and dense foliage creates a friendlier home for fungal disease.
Some crops can be planted more closely than the rows on a seed packet suggest. This is called intensive or square-foot-style planting. It works best when the bed has good fertility and you harvest often. Large plants still need their own space. A full-size tomato, cucumber, or zucchini doesn’t become compact just because it lives in a raised bed.
Set transplants at the same depth they grew in their containers, except for tomatoes, which can usually be planted deeper because they form roots along buried stems. Water the new plants at the base. Wetting foliage late in the day can keep leaves damp for hours.
Water, mulch, and feed the soil
Raised beds often warm and drain faster than ground-level gardens. Check moisture with your finger a couple of inches below the surface. The top may look dry while the root zone is still damp, or it may look fine while the soil beneath has turned dusty.
Vegetable gardens commonly need about 1 inch of water per week from rainfall and irrigation, though hot weather, sandy soil, and large plants can push that need higher.
Deep, less frequent watering is usually better than a quick daily sprinkle. Apply water slowly enough that it reaches the root zone instead of running off the surface. A soaker hose or drip line makes this easier, particularly for retirees or anyone who doesn’t want to haul a watering can every morning.
Mulch the surface with shredded leaves, clean straw, or finished compost. Keep mulch a little away from plant stems. Mulch reduces evaporation, softens the impact of heavy rain, and makes small weeds easier to pull. Grass clippings can work when they’re free of herbicides and spread in thin layers.
Compost feeds the soil gradually and improves its texture. Add a thin layer between seasons or around established plants. Don’t pour fresh manure into a bed that holds crops you’re about to harvest. It can burn roots and may carry pathogens. Well-aged compost is the calmer choice.
Handle weeds, pests, and common problems
Pull weeds while they’re small. This sounds almost too obvious, but it changes the whole workload. A five-minute check every few days beats a Saturday spent fighting roots that have taken over.
Inspect leaves, stems, and the undersides of foliage. Look for holes, sticky residue, webbing, or clusters of insects. Handpick larger pests when possible. Row cover can protect young plants from certain insects and light frost, but it must be removed when pollinators need access to flowers.
Rotate plant families when space allows. Don’t grow tomatoes, peppers, and eggplants in the same bed year after year if disease has been a problem. They share several pests and diseases. Move that group to another bed and follow with beans, greens, or a cover crop.
Yellow leaves don’t always mean a plant needs fertilizer. Overwatering, compacted soil, cold temperatures, root damage, and natural aging can look similar. Check the soil and the whole plant before adding anything. More fertilizer isn’t a universal fix. Sometimes it just produces lots of leaves and very little fruit.
Protect the bed through winter
When the season ends, remove diseased plants and any fallen fruit. Healthy plant debris can be chopped and composted. Add compost to the bed, then cover bare soil with leaves or straw. Leaving soil exposed invites erosion and lets nutrients wash away.
A 2- to 3-inch layer of organic mulch can noticeably reduce surface evaporation and help protect soil from temperature swings during winter and summer.
Don’t turn the soil over repeatedly. Excessive digging breaks apart soil aggregates and disturbs worms and other useful organisms. Loosen only compacted areas, then let roots and soil life do more of the work.
Keep your first season simple
A productive first bed might hold lettuce, basil, bush beans, one or two tomato plants, carrots, and a few flowers for pollinators. That’s plenty. Give each crop enough room, label varieties, and watch what happens.
🌱 Explore Raised Bed Gardening in More Detail
Getting started with raised bed gardening involves several important decisions. We’ve created additional guides to help you explore each topic in greater detail, from building your first raised bed to keeping your vegetables healthy and productive.
🛠️ Planning and Building Raised Garden Beds
Learn how to choose the right bed size, select building materials, and design a garden that fits your available space.
Raised Garden Bed Materials and Construction Basics
🌿 Creating Healthy Raised Bed Soil
Discover how to prepare nutritious soil, improve drainage, and use compost to support healthy plant growth.
Raised Bed Gardening Soil Guide: Compost, Fertilizer, and Soil Health
🥕 Choosing Vegetables for Raised Beds
Explore beginner-friendly vegetables, seasonal planting choices, and ways to make the most of your growing space.
How to Plan and Design a Raised Bed Garden for Beginners
🌱 Planting and Spacing Your Vegetables
Learn how to arrange plants, avoid overcrowding, and give your vegetables the room they need to thrive.
How to Plant Vegetables in Raised Garden Beds: A Beginner’s Guide
💧 Watering and Maintaining Raised Beds
Find practical advice on watering, mulching, fertilizing, and keeping your garden productive throughout the season.
Raised Bed Garden Watering and Maintenance: A Complete Beginner’s Guide
🐛 Solving Common Raised Bed Problems
Learn how to recognize common pests, weeds, plant diseases, and other gardening challenges before they become major problems.
FAQs for Raised Bed Gardening for Beginners: The Complete Step-by-Step Guide
Can I put a raised bed on grass?
Yes. Remove the sod, or cover it with overlapping plain cardboard before adding soil. Cut back any persistent perennial weeds first. Avoid placing the bed where water already pools. The cardboard will break down, and roots can eventually move into the soil below.
Does a raised bed need a bottom?
Usually, no. An open-bottom bed drains better and lets roots, worms, and soil organisms move between the bed and native ground. A bottom makes sense on concrete, a balcony, or another hard surface. Container-style beds need more frequent watering.
How deep should a raised bed be for vegetables?
Six to 12 inches works for many vegetables, herbs, and greens. Root crops and large plants need more depth. A 12- to 18-inch bed gives carrots, parsnips, tomatoes, and other deep-rooted crops more room, though soil quality still matters.
Can I use regular garden soil in a raised bed?
You can mix some garden soil into a raised bed, but using it alone often creates a dense, poorly draining layer. Combine it with finished compost and other organic material. Don’t use soil from an unknown site, especially where construction, old paint, or industrial activity may have occurred.
How often should I water a raised garden bed?
Check the root zone rather than following a rigid calendar. Water when the soil feels dry a couple of inches down. Newly planted seedlings may need frequent attention, while established plants usually prefer a thorough soaking. Weather, soil type, plant size, and mulch all change the schedule.
What is the easiest vegetable to grow in a raised bed?
Leaf lettuce, bush beans, radishes, basil, and chard are forgiving choices. Radishes mature quickly, beans give a clear harvest signal, and lettuce tolerates cooler weather. Start with crops your household enjoys. That makes the daily check worth doing.
Build one good bed and learn from it
A raised bed succeeds because several ordinary decisions work together: a sunny location, sturdy materials, enough soil depth, sensible spacing, steady water, and regular observation. Nothing here requires a huge yard or years of experience.
Start small. Grow food you’ll use. Keep notes when something surprises you. By the time you build a second bed, the first one will have taught you more than any shopping list could.
🌱 FREE DOWNLOAD: Your First Raised Bed Garden
A Beginner-Friendly Guide to Getting Started
Thinking about growing your own vegetables in a raised bed? Start with a simple plan that helps you avoid costly mistakes and build a garden you can enjoy for years.
Our FREE Your First Raised Bed Garden guide provides practical, beginner-friendly information to help you:
- Choose a suitable location with enough sunlight.
- Plan the size and layout of your raised garden bed.
- Understand the basics of preparing healthy garden soil.
- Select vegetables that are appropriate for beginners.
- Get started with planting, watering, and caring for your garden.
You don’t need a huge backyard, expensive equipment, or years of gardening experience to get started!
Get Your FREE Raised Bed Gardening Guide
Free PDF guide from Backyard Living Books.
📗 Ready to Grow Your Own Fresh Vegetables?
Creating a productive raised bed garden takes thoughtful planning, healthy soil, and a little know-how.
Take the guesswork out of raised bed gardening!
Raised Bed Gardening Made Easy: Plans, Soil Mixes, Planting Secrets, and Beginner-Friendly Harvests is a practical guide designed to help you:
- Plan and build raised garden beds that fit your space.
- Choose materials and prepare the right soil mix.
- Select and plant vegetables for productive harvests.
- Understand watering, fertilizing, and routine garden maintenance.
- Avoid common mistakes that can waste time and money.
Whether you’re planting your first garden or looking to improve an existing one, this book will help you garden with greater confidence.
Explore Raised Bed Gardening Made Easy
🌿 Want More FREE Raised Bed Gardening Tips?
Visit our Gardening Learning Center for helpful articles, practical advice, and beginner-friendly resources covering everything from soil preparation and vegetable planting to watering, pest prevention, and seasonal gardening.
Explore the Gardening Learning Center
Part of the Backyard Living Series: Build • Grow • Raise • Thrive.